If you're reading this, then hopefully all went well for you while following my previous tutorial on setting up and hosting your own website!
Now, you're probably wondering how you can change your website's homepage, and add more pages! In this article, I'm going to cover that, and also have a look at some other things you can do with Abyss Web Server and your website.
Further help is available on the Abyss Web Server website. There's a forum there too, if you have any other issues.
Go to your Abyss Web Server folder, where you installed it before. Inside it, there should be a few individual files, and a few more folders, called console, doc, htdocs, kcstore, lang and log. The folder we want to focus on is htdocs. This is where all of your website's pages will be stored. Open it up.
Inside the htdocs folder, there should be two files - index.html and pwrabyss.gif. Feel free to delete the pwrabyss.gif file; that's just a little Abyss Web Server logo. Let's take a look at what index.html is now.
If you want Abyss Web Server to display a webpage, you create a HTML file called index.html. If you don't do this, Abyss Web Server would simply list all the files inside the htdocs folder. This webpage on my website, for example, is called index.html.
There can only be one index.html file per folder.
Each sub-folder you create inside htdocs can become a webpage too! You could create a new folder called "About", and its URL would be http://yourwebsite/About. To explain what I mean a bit further, all these articles are stored in a folder called "pigeonstuff" inside htdocs and then inside "pigeonstuff", there's another folder called "get-started-website", hence the current URL you're on is https://pigeonburger.xyz/pigeonstuff/get-started-website. And of course, in every folder I have (including this one), there is an index.html file.
For this part, you'll want a good code editor to edit the HTML file.
I use Visual Studio Code. It's made by Microsoft, and works on Mac, Windows and Linux. It supports so many different programming languages as well; I use it for everything. It might seem like a bit of overkill for a simple HTML file, but who cares!
If you already have another code editor, then just use that.
If you wanna actually make a homepage, you're going to have to at least learn basic HTML coding. I recommend teaching yourself the basics using W3Schools. They have really easy tutorials to follow on everything.
In the meantime, here's a basic homepage you can try copying and pasting. Open the index.html file in your code editor, and delete everything, then paste this:
<!DOCTYPE html>
<head>
<Welcome to my homepage!>
<meta name='viewport' content="width=device-width, initial-scale=1">
</head>
<body>
<style>
html {
background-color: black;
color: lime;
}
</style>
<h1>Welcome to my website!</h1>
<p>This is my website's homepage!</p>
</body>
</html>
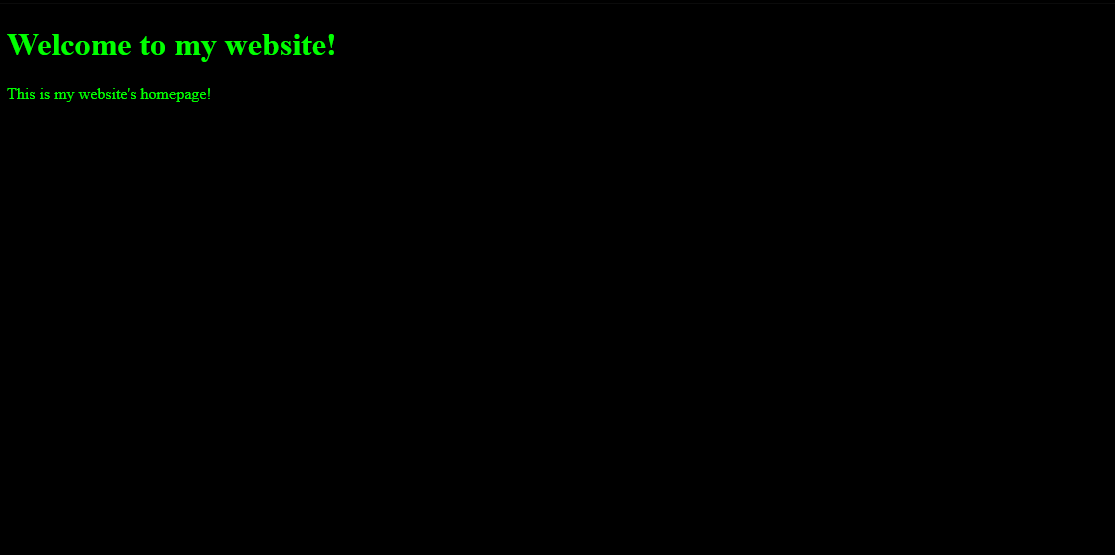
Save the new file (make sure it's called index.html and visit your website! You should see something like this:

Once you learn more HTML, you can do whatever you want (don't forget you can add extra folders inside htdocs to make more pages. Have fun!
Without a proper website name and other security measures, your website isn't really safe - both for you running the website, and people visiting it. Your IP address is completely exposed, making it easy to try simple cyber attacks on you. Before you can do the security measures I detail below, you need to buy a domain name.
I bought my domain name (pigeonburger.xyz) from one of the biggest domain name providers - GoDaddy. I chose .xyz because of how cheap it was - only AU$1.50!! Other domains, like ones that end in .com, can be much more expensive, but it's your choice! .xyz is still considered a Top-Level Domain, like .com, .org, .net, etc.
I would definitely recommend buying a domain name from GoDaddy.com. In my research, they have some of the cheapest domain names. Another good, reputable one is Namecheap.com.
Some steps I'm about to detail require you to do some things on your domain name provider's website, such as changing your nameservers. This can differ depending on where you buy your domain from, but the steps are basically the same.
First, buy that domain name!
The first security measure I recommend using is Cloudflare. They're a company that provides free website security services. I use them for my website, and it's pretty much essential, especially for small websites. They also offer some really good details and analytics about your website, which are really good to know.
Press the sign up button and enter all the required details. After doing that, it should ask you to enter your domain name. It hasn't been connected to your actual website yet, but just enter the domain name you bought (e.g. example.com).
It will then ask you to select a plan. Just choose 'free'.