If you weren't previously aware, this website is created and hosted entirely by myself on my own computer. This article will teach you how to do what I did.
Rather than using a more common web server program, like Apache, Nginx or IIS, I decided to use a program called Abyss Web Server. It's not very well known or commonly used, but I reckon it's one of the best. It's really easy to get started, and only takes a little time to get used to, unlike other programs.
Abyss Web Server is available on Windows, Mac and Linux. Apart from the initial installation process, the software is exactly the same on all platforms. I'll cover the installation progress for all of them.
Be aware that if you're installing this on Linux, you have to have a very basic knowledge of using the terminal. I can still provide all the steps on what you need to do, but it helps if you get used to it.
Further help is available on the Abyss Web Server website. There's a forum there too, if you have any other issues.
The software you'll want to download is Abyss Web Server X1. There's also Abyss Web Server X2, but that costs money, and is only really useful if you want to host multiple different websites.
I host Abyss Web Server for all platforms on this website, and you can find them here. Download the one for your specific platform.
If you're on a Linux system, you can download it via the terminal by using this command: wget https://pigeonburger.xyz/abyss/abwsx1.tgz. Or, if you have a desktop OS, then you can just get it from the link I mentioned above.
The installation process is really simple for Windows - just run the abwsx1.exe file you downloaded and follow the instructions. Make sure you install the program in a folder that doesn't require special permissions (like the Desktop, for example). Then, just start up the program. A small window should pop up, saying "default host on port 80 is up and running". If it did, then your website is accessible on your local network! To see what it looks like, type localhost or 127.0.0.1 into your browser, and you should see a welcome page.
If you haven't dealt with tarballs (.tgz, .tar.gz, .tar.bz2 files) in Linux before, it's probably one of the most tricky ways to install a program. First of all, move the abwsx1.tgz file to the place where you want to install Abyss Web Server. Then, open terminal (if you're on a desktop OS and haven't already) and change the directory to the one with that file in it (e.g. cd Desktop)
Now, you need to extract the files from the .tgz file. To do this, type tar xvzf abwsx1.tgz. This extracts all of the files, and puts them in a folder in the same directory that should be called abyssws. Change the terminal directory to this folder by typing cd abyssws.
Now type sudo ufw allow 80 so your computer's firewall doesn't block the website.
Now you can start it up for the first time! In the abyssws folder, just for the first time, run the command sudo ./abyssws-x64. Then enter your password. Running a program on port 80 (the standard network port used for websites) requires elevated priveliges, which is why you need to run it as sudo.
The terminal should now say something like default host on port 80 is up and running and then have your local console url below. To double check that it's working, open a browser window on your computer and type localhost or 127.0.0.1 into the address bar. If it loads with the standard Abyss Web Server greeting, then it's now accessible on your local network.
Every other time you want to run Abyss Web Server from now on, you just have to type sudo ./abyssws in the abyssws folder.
If you're using a server OS, and therefore can't open a browser on that computer, you can access it from another device by entering its local ip address (for example if I was to do that, I'd type in 192.168.0.27, because that's my server's local ip). You can find your computer's local ip by typing hostname -I into the terminal (make sure it's a captial I, otherwise you'll get the wrong thing). The sequence of numbers it returns (should look something like 192.168.0.x or 192.168.1.x) can be typed into the browser of another device on the same network, and you should see the Abyss Web Server success page!
I've never installed this on Mac before, so I can't really help on this one. Abyss Web Server's website says to click the .dmg file you downloaded, then read the file called Installation Instructions inside it. Once you've installed it, start up the program. A small window should pop up, saying "default host on port 80 is up and running". If it did, then your website is accessible on your local network! To see what it looks like, type localhost or 127.0.0.1 into your browser, and you should see a welcome page.
The Abyss Web Server console is where you can change all the settings for your website, and it's one of the most important parts.
The default network port the console runs on is 9999
If you have a browser on your computer, just type localhost:9999 or 127.0.0.1:9999. Otherwise, you can access it from another device by typing in the computer's local ip, followed directly by :9999.
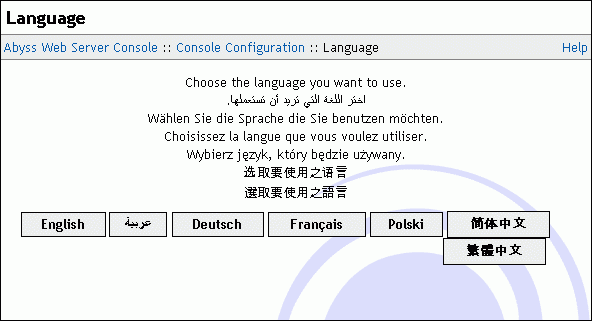
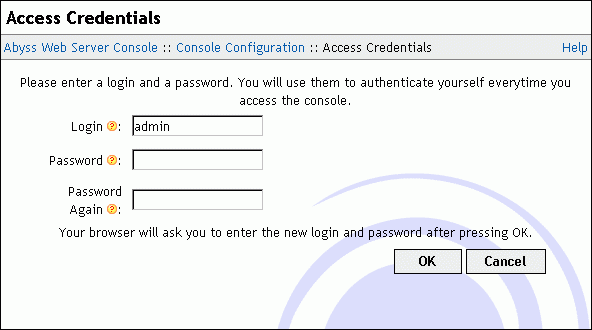
The first time you access this page, it will ask you to select a language, and then set a username and password. The username and password are going to be used every time you want to access the console, for security. Once you set the username and password, you will be asked to enter them again.
So once you've logged in, you should be at a page like the one below:
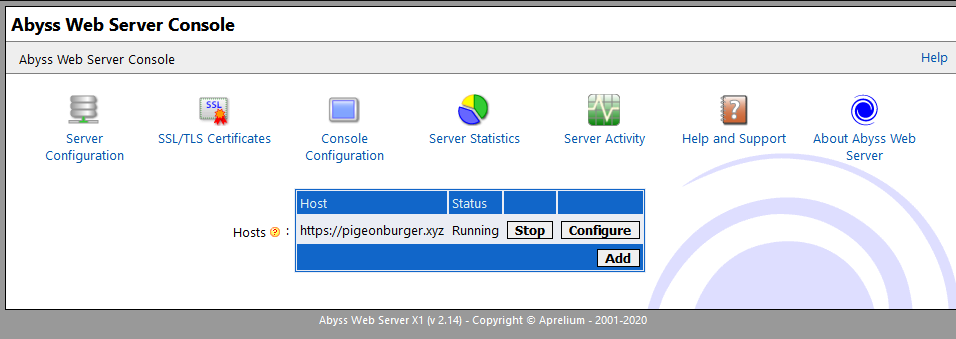
You don't have to do anything else with the console right now, I just wanted to show you that because it becomes a very important part later. I suggest bookmarking that page or something.
Right now, only you and people who are connected to your local network can see your site. There's a few more steps you need to do to make it accessible on the internet.
The first thing to do is find out what your public ip address is. You can find it out here, at the top of the page (make sure you're not connected to a VPN or anything else like that while you're doing this).
Since you don't have a domain name (an address ending in .com, .xyz, etc), you can use your IP address to make it accessible for now.
Beware that giving your public IP to anyone you don't know can be dangerous. You should buy a domain name as soon as possible.
Don't worry! It's virtually impossible for someone to find your specific IP by themselves. I'm just telling you to use your IP for now so you can test that it's accessible from the internet.
I will make a tutorial on how to link your domain name, and the best security practices to follow very soon.
All your programs, apps and websites connect using different ports. For example, most websites you connect to use port 80 or 443, and Call of Duty uses port 3074. Generally, a port is only used for one type of service.
For now, you will be using port 80. This is used by websites without SSL certificates (I'll explain what they are at a later date). You will have to forward port 80 on your router. Port forwarding means that all requests to your public IP address on that specific port are forwarded from your router/modem, to the computer running the service.
You'll need access to your router. In a browser on any device connected to your network, type in 192.168.0.1 (for some people, it may be 192.168.1.1). If you get prompted for login details, then enter the ones your service provider gave you (I can't help with that, those are specific to you). If you don't get prompted to login, then don't worry about that part.
All routers are different, and as such, there's no one specific way to get to the port forwarding page. They all have similarities, though. I'll go through the instruction for how to do it on my router. It should (hopefully) be straightforward for you.
Once you've logged into your router, there should hopefully be something like a device list. Click the device that has Abyss Web Server on it. Once you've done that, look through all the options for something like "Reserve IP" or "Reserve address" and make sure the IP for that device is reserved. This is so your IP doesn't change by itself, meaning you'll have to port forward and do everything all over again, etc.
Go back to the main page of your router, and find a section called something like "Network Settings" (it could also be under an "advanced" tab). Inside the "Network Settings/Advanced/something else" tab, look for a section called "Port Forwarding" and go onto it.
Press "Add Rule"
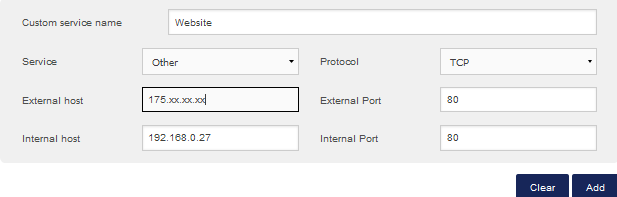
For simplicity's sake, if there's an option that says "Service" or "Service Name", just call it something like "Website" or "Web server". Set both the internal and external ports to 80, and make the protocol TCP.
Make the "Internal IP", or "Internal Host" the local IP address of the computer the the web server software on it. To see your local IP on Windows, open Windows Powershell and type gip. Your local IP will be next to IPv4Address. For Mac users, open System Preferences, select Network, then select the network you're connected to. It should list your local IP there. Linux users, type hostname -I (capital I).
For "External IP" or "External Host", make it your public IP that you found earlier. On most routers, just adding an asterisk (*) also works too. Then press add rule.
Your ports should now be forwarded!
Most computers come with a firewall that block things like port 80 (because you don't need it open if you don't run a website), so one of the final things you'll need to do is create a firewall rule that allows port 80. If you know you don't have a firewall, then don't worry about this step.
If you're on Linux, you should've ran the command sudo ufw allow 80 to allow port 80. If not, then run that command now.
See this article on how to create a firewall rule in Windows (note that if you have a separate antivirus firewall, you'll have to search and find out how to allow port 80 on that).
To open a port on your Mac's firewall, look at this.
To do this part, you can't be on the same network as the computer running Abyss Web Server. You can switch to mobile data on a phone, or use something like a vpn. If you don't have access to anything like that, you can stay on the normal network, and use a web proxy like Zalmos.
Once you've done that, enter your public IP address into the address bar. Hopefully, you should see the AByss Web Server page you saw earlier!! If not, don't worry, port forwarding and adding firewall rules can be the trickiest thing, so check you followed everything correctly. One main thing that seems to work is just making the public IP address an asterisk (*).
Congratulations! Your website is now on the internet! I will create further tutorials on how to change that homepage, and how to connect a domain name, etc. Good luck if you were just reading everything before you actually start doing it!